Posts

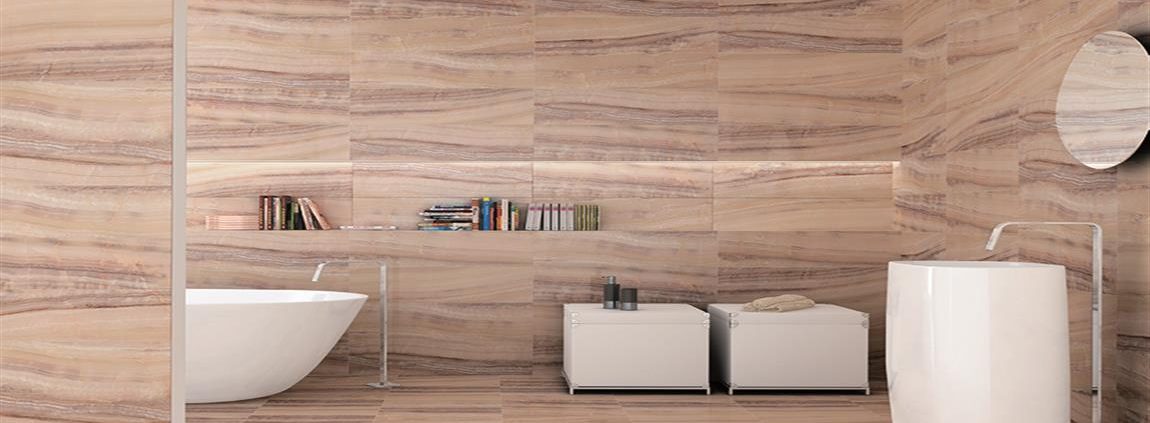
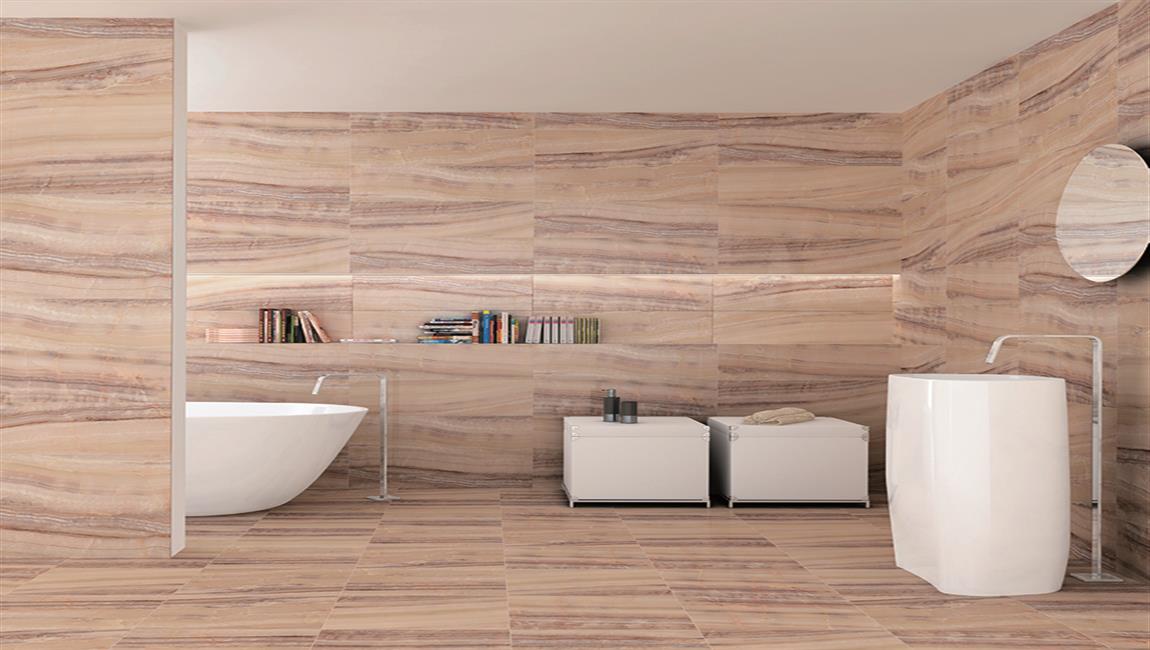
How Attaching Your marble tiles?

Install your kitchen sink if necessary. If you had to remove your kitchen sink when removing your old marble tiles, be sure to reinstall it before adding the new material. Start by following manufacturer’s directions to install the faucet followed by detergent and dispenser mounts. Now, attach the sink, supply lines, and drain pipes.


Always apply a ribbon of plumber’s putty before installing the faucet and sprayer bases. Use caulk to attach the sink rim to its opening. Seal the drain and tailpipe with caulk or with a gasket—whichever the manufacturer recommends. Be sure to turn your water on and check for leaks before installing your marble tiles.


Stick painter’s tape to the top edges of the cabinets for protection. Try to cover at least the top 1 inch (2.5 cm) of the cabinets, although the more the better. This will ensure that no silicone adhesive touches their faces. Purchase painter’s tape from any home hardware store or online supplier.


Install ledgers in areas of low cabinet support. While marble tiles can be placed directly on top of cabinets, their weight shouldn’t be underestimated. Take a look at your tiles design and look for areas that have the least amount of cabinet support. Now, install 1 to 2 inch (2.5 to 5.1 cm) ledgers into the walls on the sides of the cabinets to add support.


Attach each ledger using an electric drill and the screws provided. Purchase ledgers from home hardware stores. Be sure to take measurements of the areas that need ledgers before purchasing any. Apply silicone adhesive beads to the top of the cabinets. Start by applying a 2 to 3 inch (5.1 to 7.6 cm) thick bead of adhesive to a corner and then working your way around the top of each cabinet.

How Filling Gaps with Wood Glue?


Scoop up a glob of wood glue using a small utensil. A toothpick, cotton swab, or similar item will make it easier to reach down into the narrow space. Some home improvement buffs even use disposable syringes for precision application. The important thing is that the glue only ends up on the grooves where the planks interlock.


Any clear or yellow wood glue will work just fine. Invest in a high-strength adhesive to spare yourself followup repairs in the future. Alternatively, you can also use caulk or wood putty to fill in gaps in laminate flooring. However, these substances may require special applicators or additional equipment.


Swab the glue onto the exposed tongue of the displaced plank. Inside the gap, you should be able to see the squared edge where the bottom of the plank is designed to fit together with the top of the next one in the row. Apply a thick coating of glue to this surface, aiming for even coverage from one end to the other. If you don’t apply enough glue, the repaired section of flooring may not hold up long under constant foot traffic.


Don’t be afraid to use more glue than you think you need—you don’t want the planks separating again after a few short days. Do your best to work neatly and efficiently, but don’t take too much time. Wood glue dries quickly, and once it does, it will be tough to get a second shot.


Push the separated planks together to close the gap. To do this, strike the plank at an angle repeatedly with the palm of your hand. For a less forceful approach, you could also try placing both hands flat against the plank and guiding it slowly towards its neighbor using your full body weight.

How to Clean Stone Tile?

Stone tile is durable and waterproof, which makes it a popular choice for flooring. Although it is a popular choice, stone tile needs to be cleaned often and maintained properly to remain in good condition. For a routine cleaning, you can do things like mop your floor with warm water and detergent. Spots should be attended to immediately, and the cleaner used for spots depends on what has been dropped. Along with the tile itself, the grout should be cleaned regularly for an overall clean and shiny floor.

Make a paste with baking soda and water. You will need to use baking soda and water. Combine the baking soda with a small amount of water. Add more water or baking powder if necessary until a paste is made. Saturate the grout. Apply the paste directly to the grout. Use enough paste so that the dirty grout is saturated with the baking soda and water. The paste should only be applied to the grout. Do not put it on the tile.

Let the paste sit. The amount of time you allow the paste to sit depends on how dirty the grout is. If the grout is only slightly dirty, you can allow it to sit for a few hours. Allow the paste to sit overnight if the grout is very dirty. Scrub the grout. Once you have let the paste sit, scrub the grout with a toothbrush. You may have to use a little force if the paste has hardened. Scrub until you see clean grout underneath.

If your grout is really dirty or if you have a lot of cleaning to do, you may wish to purchase a grout brush. Grout brushes have stiffer bristles than toothbrushes, so they can remove stubborn dirt more efficiently. You can get one for about $3 to $10 USD at a hardware or home supply store. Wash off the paste. Pour water onto the remaining paste. Rinse the grout off until all of the paste is gone. Use a towel to wipe off the paste. Dry with a towel. You can use oxygen bleach on the grout if it doesn’t turn out as clean as you’d like after the paste.

How to Clean Stone Tile Floors?

Stone tile floors are a great investment, because they’re durable and beautiful. Plus, crumbs and dust bunnies are often hidden by the natural stone variation. Fortunately, since they’re so durable and naturally beautiful, cleaning stone tile floors is straightforward. Regularly clean them with a soft mop and gentle cleaner, scrub the grout, and remove stains if you need to.

Sweep with a soft broom every day. Dirt and crumbs can build up and potentially scratch your tile, so make sure you sweep it up every day. Use a soft bristle broom and a dustpan with a rubber edge. Make sure your vacuum has a hard floor setting. If you want to use your vacuum on your stone tile floors, make sure it has a hard floor setting. Look under your vacuum to be sure it doesn’t have rotating brush heads either. Don’t scratch your stone tile floors!

Mop with a soft sponge or mophead weekly. Keep grime at bay by mopping stone tile floors weekly. Use a soft mop head or sponge and don’t drench the floors with water. Dampen a mop with the cleaning solution and wash dirt away. Use diluted general floor cleaner on harder stone floors, such as granite and slate. Use stone cleaner on softer stone, such as marble and limestone.

Use a stone cleaner on soft stone. Marble and limestone can scratch easily, so make sure you mop them weekly with a stone tile cleaner. Strong cleaner will damage the surface of soft stone. Purchase a specially formulated stone tile cleaner at your local home store, or ask your tile dealer for a good recommendation.

Scrub grout with a soft brush. Use a soft scrub brush to get to spaces between tiles. Use a stone cleaner on soft stone and try an all-purpose cleaner on granite and slate. Dip a small to medium-sized brush in your cleaner of choice and scrub grout vigorously. Wipe cleaner off with a water-dampened sponge.

How to Clean a Stone Tile Shower?

Caring for the stone tile in your shower will preserve its appearance and maintain its condition. Proper care can keep your stone looking like-new for generations. Clean most kinds of dirtiness from your cement tile with a mild detergent, a soft cloth, and a soft bristle brush. Remove stains from ceramic tile by identifying the kind of stain and using the right kind of treatment, like ammonia for oil based stains. Maintain your element tile by avoiding acidic and abrasive cleaners and by removing excess moisture from the stone after every shower.

For severe stains, you may have to reapply the poultice a few times before it is fully removed. Some stains may take five applications or more. Stain removing poultices can be purchased from your local hardware store or home center. Look for it among stone care products.

Some kinds of poultice are sold as pre-made strips of treated paper. These are generally applied to stains similarly to paste poultices.

Buff out water spots and rings with 0000 steel wool as necessary. Hard water can leave rings, a white film, or scale on your stone. When the stone is dry, buff the surface in a circular motion with a dry piece of 0000 rated steel wool. Wipe the surface with a clean, dry, soft cloth or rag after. Use light to moderate pressure when buffing your countertop. Too much pressure may harm the appearance of your stone.

Hire a professional to deep-clean your spots tile. Professional cleaners have special tools and techniques that can extract dirt or grime that may have impacted the pores of the stone, which causes dullness. Have your rustic tile cleaned by a professional when thorough cleaning fails to restore the stone’s luster.

Persistent stains or blemishes that are difficult to treat may require an expert. Call a stone care professional, installer, or restoration specialist to treat problems like these.